
If you haven’t already, check out my previous post Kubernetes: Getting Started with Minikube.
helloworld — pod, service
Create a folder and cd into it
mkdir helloworld-example-01; cd helloworld-example-01Create pod.yaml
- Creates 1 pod
vi pod.yaml
---
apiVersion: v1
kind: Pod
metadata:
  name: itsmetommy
  labels:
    app: helloworld
spec:
  containers:
  - name: itsmetommy-httpd
    image: httpd
    ports:
    - name: web-port
      containerPort: 80
Create service.yaml
- Creates 1 service
vi service.yaml
---
apiVersion: v1
kind: Service
metadata:
  name: itsmetommy-service
spec:
  ports:
  - port: 31000
    nodePort: 31000
    targetPort: web-port
    protocol: TCP
  selector:
    app: helloworld
  type: NodePort
Create your pod and service
The following command looks for all yaml files within the current directory and runs them.
kubectl create -f .Example
kubectl create -f .
pod "itsmetommy" created
service "itsmetommy-service" created
View
curl "$(minikube ip):31000"
Example
curl "$(minikube ip):31000"
<html><body><h1>It works!</h1></body></html>
OR use minikube service.
Get services.
kubectl get servicesExample
kubectl get services
NAME TYPE CLUSTER-IP EXTERNAL-IP PORT(S) AGE
itsmetommy-service NodePort 10.0.0.206 <none> 31000:31000/TCP 1m
kubernetes ClusterIP 10.0.0.1 <none> 443/TCP 39d
Launch browser.
minikube service itsmetommy-serviceExample
minikube service itsmetommy-service
Opening kubernetes service default/itsmetommy-service in default browser...
Clean up
kubectl delete -f .Example
kubectl delete -f .
pod "itsmetommy.com" deleted
service "itsmetommy-service" deleted
helloworld — deployment (replica set), pod, service
Note: Deployments manage Replica Sets and Replica Sets manage Pods.
Create a folder and cd into it
mkdir helloworld-example-02; cd helloworld-example-02Create deployment.yaml
- Creates 1 deployment
- Creates 3 pods
vi deployment.yaml
---
apiVersion: extensions/v1beta1
kind: Deployment
metadata:
  name: itsmetommy-deployment
spec:
  replicas: 3
  template:
    metadata:
      labels:
        app: helloworld
    spec:
      containers:
      - name: itsmetommy-httpd
        image: httpd
        ports:
        - name: web-port
          containerPort: 80
Create service.yaml
- Creates 1 service
vi service.yaml
---
apiVersion: v1
kind: Service
metadata:
  name: itsmetommy-service
spec:
  ports:
  - port: 32000
    nodePort: 32000
    targetPort: web-port
    protocol: TCP
  selector:
    app: helloworld
  type: NodePort
Create your deployment and service
The following command looks for all yaml files within the current directory and runs them.
kubectl create -f .Example
kubectl create -f .
deployment "itsmetommy-deployment" created
service "itsmetommy-service" created
View
curl "$(minikube ip):32000"Example
curl "$(minikube ip):32000"
<html><body><h1>It works!</h1></body></html>
OR use minikube service.
Get services.
kubectl get servicesExample
kubectl get services
NAME TYPE CLUSTER-IP EXTERNAL-IP PORT(S) AGE
itsmetommy-service NodePort 10.0.0.206 <none> 31000:31000/TCP 1m
kubernetes ClusterIP 10.0.0.1 <none> 443/TCP 39d
Launch browser.
minikube service itsmetommy-serviceExample
minikube service itsmetommy-service
Opening kubernetes service default/itsmetommy-service in default browser...
Clean up
kubectl delete -f .Example
kubectl delete -f .
pod "itsmetommy.com" deleted
service "itsmetommy-service" deleted
web — HorizontalPodAutoscaler / Autoscaling
The Horizontal Pod Autoscaler automatically scales the number of pods in a replication controller, deployment or replica set based on observed CPU utilization (or, with custom metrics support, on some other application-provided metrics).
Enable metrics
minikube addons enable heapstercAdvisor web UI
Analyzes resource usage and performance characteristics of running containers.
http://$(minikube ip):4194/containers/
Example
http://192.168.99.100:4194/containers/
OR
open http://$(minikube ip):4194/containers/Grafana Dashboard
Data visualization & Monitoring with support for Graphite, InfluxDB, Prometheus, Elasticsearch and many more databases.
minikube addons open heapsterCreate pod
kubectl run web --image=k8s.gcr.io/hpa-example --requests=cpu=200m --port=80Create deployment
kubectl expose deployment web --type=NodePortCreate Horizontal Pod Autoscaler
kubectl autoscale deployment web --min=2 --max=10 --cpu-percent=40Watch
Install watch.
brew install watchWatch hpa, pods and services.
watch kubectl get hpa,pods,services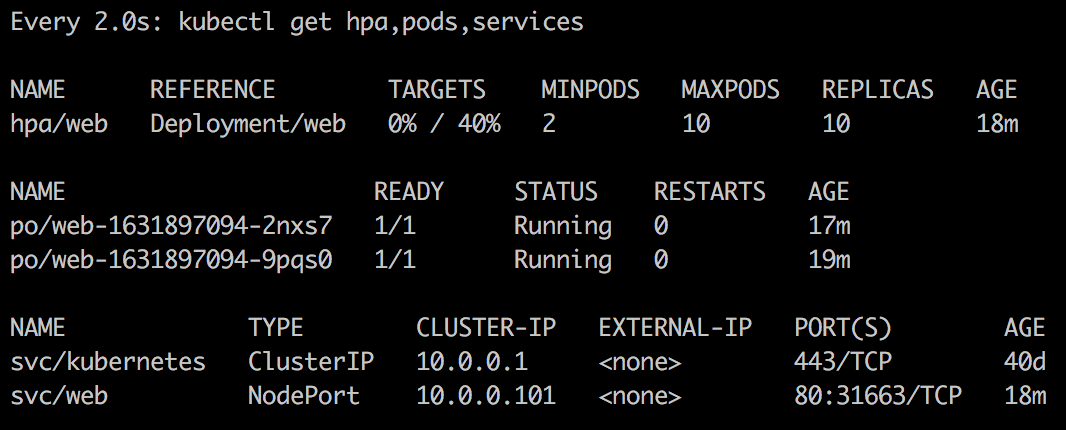
Add load
Using your minikube IP along with the service port of web, we can write a while loop that sends http requests to the service, driving the CPU up.
Get your minikube IP.
minikube dashboard --urlExample
minikube dashboard --url
http://192.168.99.100:30000
Get your service port.
kubectl get service webExample
kubectl get web
NAME TYPE CLUSTER-IP EXTERNAL-IP PORT(S) AGE
web NodePort 10.0.0.101 <none> 80:31663/TCP 17m
Run the while loop.
while true; do curl -s http://192.168.99.100:31663; doneYou should now see pods spinning up automatically based on load.
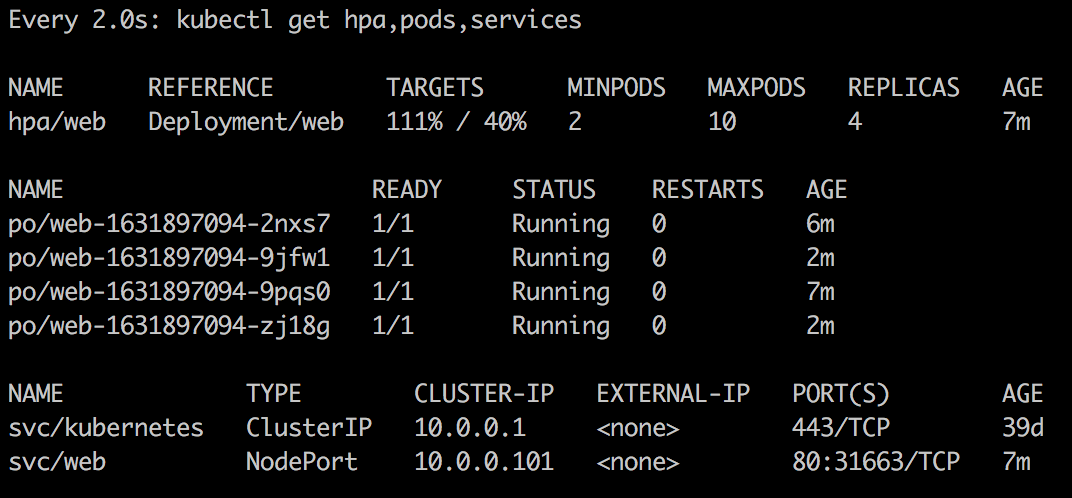
Stop the while loop and watch the pods terminate back down to one.
Clean up
kubectl delete deployment,hpa,service webhelloworld — HorizontalPodAutoscaler / Autoscaling
Now that we’ve learned how to manually create a Horizontal Pod Autoscaler, let’s use YAML files this time.
If you followed along, you should already have metrics enabled. I’ll add the step here again just in case.
Enable metrics
minikube addons enable heapstercAdvisor web UI
Analyzes resource usage and performance characteristics of running containers.
http://$(minikube ip):4194/containers/
Example
http://192.168.99.100:4194/containers/
OR
open http://$(minikube ip):4194/containers/Grafana Dashboard
Data visualization & Monitoring with support for Graphite, InfluxDB, Prometheus, Elasticsearch and many more databases.
minikube addons open heapsterCreate a folder and cd into it
mkdir helloworld-example-03; cd helloworld-example-03Create deployment.yaml
- Creates 1 deployment
vi deployment.yaml
---
apiVersion: extensions/v1beta1
kind: Deployment
metadata:
  name: itsmetommy-deployment
spec:
  template:
    metadata:
      labels:
        app: helloworld
    spec:
      containers:
      - name: itsmetommy-httpd
        image: httpd
        ports:
        - name: web-port
          containerPort: 80
        resources:
          requests:
            cpu: 100m
Create autoscaler.yaml
- Creates 1 hpa
I set the targetCPUUtilizationPercentage to 5 in order to get a faster autoscale.
vi autoscaler.yaml
---
apiVersion: autoscaling/v2beta1
kind: HorizontalPodAutoscaler
metadata:
  name: itsmetommy
  namespace: default
spec:
  scaleTargetRef:
    apiVersion: apps/v1beta1
    kind: Deployment
    name: itsmetommy-deployment
  minReplicas: 1
  maxReplicas: 10
  targetCPUUtilizationPercentage: 5
Create service.yaml
- Creates 1 service
vi service.yaml
---
apiVersion: v1
kind: Service
metadata:
  name: itsmetommy-service
spec:
  ports:
  - port: 32500
    nodePort: 32500
    targetPort: web-port
    protocol: TCP
  selector:
    app: helloworld
  type: NodePort
Create your deployment, service and autoscaler
kubectl create -f .View
View your application.
curl "$(minikube ip):32500"Example
curl "$(minikube ip):32500"
<html><body><h1>It works!</h1></body></html>
OR use minikube service.
Get services.
kubectl get servicesExample
kubectl get services
NAME TYPE CLUSTER-IP EXTERNAL-IP PORT(S) AGE
itsmetommy-service NodePort 10.0.0.247 <none> 32500:32500/TCP 38s
kubernetes ClusterIP 10.0.0.1 <none> 443/TCP 40d
Launch browser.
minikube service itsmetommy-serviceExample
minikube service itsmetommy-service
Opening kubernetes service default/itsmetommy-service in default browser...
Watch
Watch hpa (Horizontal Pod Autoscaler), pods and services.
watch kubectl get hpa,pods,servicesAdd load
Using your minikube IP along with the service port of itsmetommy-service, we can write a while loop that sends http requests to the service, driving the CPU up.
Get your minikube IP.
minikube dashboard --urlExample
minikube dashboard --url
http://192.168.99.100:30000
Get your service port.
kubectl get service itsmetommy-serviceExample
kubectl get services
NAME TYPE CLUSTER-IP EXTERNAL-IP PORT(S) AGE
itsmetommy-service NodePort 10.0.0.247 <none> 32500:32500/TCP 38s
kubernetes ClusterIP 10.0.0.1 <none> 443/TCP 40d
Run the while loop.
while true; do curl -s http://192.168.99.100:32500; doneMake sure to check out the watched pods within your terminal as the pods spin up.
Stop the while loop and watch the pods spin down.
Clean up
kubectl delete -f .