

Let’s go over how to create a Wildcard Certificate that also auto-renews.
Wildcards are challenged by DNS-01.
This challenge asks you to prove that you control the DNS for your domain name by putting a specific value in a TXT record under that domain name.
This requires DNS access, especially when you are automating the renewal process from the server.
I’ll bell creating a Wildcard SSL Certificate for sub-domain *.wonderwoman.itsmetommy.io.

Install nginx
{
  sudo yum -y install nginx
  sudo systemctl start nginx
  sudo systemctl enable nginx
}Optional: I updated the default index.html file so I can get a clean OK from curl during testing.
echo 'OK' | sudo tee /usr/share/nginx/html/index.html > /dev/nullInstall Certbot
I am installing Certbot on CentOS 7 with NGINX, but you can use https://certbot.eff.org/ to view your system/software instructions.
My setup
- System: CentOS 7
- Software: NGINX
Enable EPEL Repo
Already enabled for me.
For CentOS users, you can install EPEL by running yum install epel-release. The package is included in the CentOS Extras repository, enabled by default.
Enable the optional channel
{
  yum -y install yum-utils
  yum-config-manager --enable rhui-REGION-rhel-server-extras rhui-REGION-rhel-server-optional
}
Install Certbot
sudo yum -y install certbot python2-certbot-nginxInstall Google DNS Plugin
sudo yum -y install python2-certbot-dns-googleSetup credentials
Google provides instructions for creating a service account and information about the required permissions. If you’re running on Google Compute Engine, you can assign the service account to the instance which is running certbot. A credentials file is not required in this case, as they are automatically obtained by certbot through the metadata service .
Create a GCP Service Account to allow Cloud DNS access.
export PROJECT_NAME=[YOUR_PROJECT_NAME]

# create service account
gcloud iam service-accounts create itsmetommy-dns \
  --display-name="Service Account to support ACME DNS-01 challenge." \
  --project=$PROJECT_NAME

# give dns admin permissions
gcloud projects add-iam-policy-binding $PROJECT_NAME \
  --member=serviceAccount:itsmetommy-dns@$PROJECT_NAME.iam.gserviceaccount.com \
  --role=roles/dns.admin
You have two options:
Option 1: Assign a Service Account to the GCE instance (recommended)
If you happen to be creating a new instance, you can simply select the Service Account under the Identity and API access section.
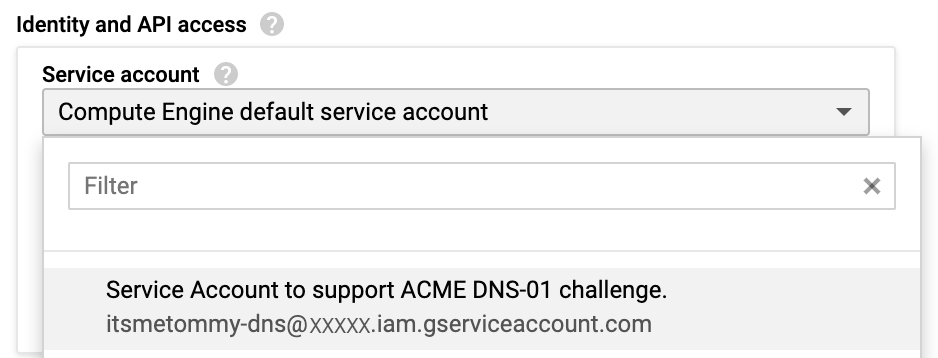
Otherwise, you must stop the VM instance to edit its Service Account.
Stop your instance, select your DNS Service Account under the Identity and API access section.

Click Save.
Start your instance.
Verify by running the following Metadata command from the server.
curl "http://metadata.google.internal/computeMetadata/v1/instance/service-accounts/" -H "Metadata-Flavor: Google"Example
curl "http://metadata.google.internal/computeMetadata/v1/instance/service-accounts/" -H "Metadata-Flavor: Google"
default/
itsmetommy-dns@aXXXXX.iam.gserviceaccount.com/
Option 2: Use a Service Account key
Create a Service Account key.
# create service account key
# this will also download the json key
gcloud iam service-accounts keys create ./credentials.json \
  --iam-account=itsmetommy-dns@$PROJECT_NAME.iam.gserviceaccount.com \
  --project=$PROJECT_NAME
Create a secrets directory to store the Service Account key on your server. You can choose your own location, as long as the path is referenced correctly when creating your certificate.
sudo mkdir -p ~/.secrets/certbotCopy the Service Account Key to your servers ~/.secrets/certbot/credentials.json location.
Create Wildcard SSL Certificate
- https://certbot.eff.org/docs/using.html#certbot-command-line-options
- https://certbot-dns-google.readthedocs.io/en/stable/
If you used option 1 when you setup your credentials.
certbot certonly \
  --dns-google \
  -d *.wonderwoman.itsmetommy.io
If you used option 2 when you setup your credentials.
certbot certonly \
  --dns-google \
  --dns-google-credentials ~/.secrets/certbot/credentials.json \
  -d *.wonderwoman.itsmetommy.io
If you take a peek at Google Cloud DNS, you should see the TXT challenge.

Update nginx config
I will use Certbot to update my NGINX config, which adds all necessary SSL and redirect changes.
certbot --nginxExample
certbot --nginx
Saving debug log to /var/log/letsencrypt/letsencrypt.log
Plugins selected: Authenticator nginx, Installer nginx
Starting new HTTPS connection (1): acme-v02.api.letsencrypt.org
No names were found in your configuration files. Please enter in your domain
name(s) (comma and/or space separated)  (Enter 'c' to cancel): *.wonderwoman.itsmetommy.io
Cert not yet due for renewal

You have an existing certificate that has exactly the same domains or certificate name you requested and isn't close to expiry.
(ref: /etc/letsencrypt/renewal/wonderwoman.itsmetommy.io.conf)

What would you like to do?
- - - - - - - - - - - - - - - - - - - - - - - - - - - - - - - - - - - - - - - -
1: Attempt to reinstall this existing certificate
2: Renew & replace the cert (limit ~5 per 7 days)
- - - - - - - - - - - - - - - - - - - - - - - - - - - - - - - - - - - - - - - -
Select the appropriate number [1-2] then [enter] (press 'c' to cancel): 1
Keeping the existing certificate

Which server blocks would you like to modify?
- - - - - - - - - - - - - - - - - - - - - - - - - - - - - - - - - - - - - - - -
1: File: /etc/nginx/nginx.conf
Addresses: 80 default_server, [::]:80 default_server
Names: _
HTTPS: No
- - - - - - - - - - - - - - - - - - - - - - - - - - - - - - - - - - - - - - - -
Select the appropriate numbers separated by commas and/or spaces, or leave input
blank to select all options shown (Enter 'c' to cancel):
Deploying Certificate to VirtualHost /etc/nginx/nginx.conf

Please choose whether or not to redirect HTTP traffic to HTTPS, removing HTTP access.
- - - - - - - - - - - - - - - - - - - - - - - - - - - - - - - - - - - - - - - -
1: No redirect - Make no further changes to the webserver configuration.
2: Redirect - Make all requests redirect to secure HTTPS access. Choose this for
new sites, or if you're confident your site works on HTTPS. You can undo this
change by editing your web server's configuration.
- - - - - - - - - - - - - - - - - - - - - - - - - - - - - - - - - - - - - - - -
Select the appropriate number [1-2] then [enter] (press 'c' to cancel): 2

Which server blocks would you like to modify?
- - - - - - - - - - - - - - - - - - - - - - - - - - - - - - - - - - - - - - - -
1: File: /etc/nginx/nginx.conf
Addresses: 443 ssl, [::]:443 ssl, 80 default_server, [::]:80 default_server
Names: _
HTTPS: Yes
- - - - - - - - - - - - - - - - - - - - - - - - - - - - - - - - - - - - - - - -
Select the appropriate numbers separated by commas and/or spaces, or leave input
blank to select all options shown (Enter 'c' to cancel):
Redirecting all traffic on port 80 to ssl in /etc/nginx/nginx.conf

- - - - - - - - - - - - - - - - - - - - - - - - - - - - - - - - - - - - - - - -
Congratulations! You have successfully enabled
https://*.wonderwoman.itsmetommy.io

You should test your configuration at:
https://www.ssllabs.com/ssltest/analyze.html?d=*.wonderwoman.itsmetommy.io
- - - - - - - - - - - - - - - - - - - - - - - - - - - - - - - - - - - - - - - -

IMPORTANT NOTES:
 - Congratulations! Your certificate and chain have been saved at:
   /etc/letsencrypt/live/wonderwoman.itsmetommy.io/fullchain.pem
   Your key file has been saved at:
   /etc/letsencrypt/live/wonderwoman.itsmetommy.io/privkey.pem
   Your cert will expire on 2019-11-01. To obtain a new or tweaked
   version of this certificate in the future, simply run certbot again
   with the "certonly" option. To non-interactively renew *all* of
   your certificates, run "certbot renew"
 - If you like Certbot, please consider supporting our work by:

   Donating to ISRG / Let's Encrypt:   https://letsencrypt.org/donate
   Donating to EFF:                    https://eff.org/donate-le
Test SSL Certificate
curl https://amazing.wonderwoman.itsmetommy.io
OK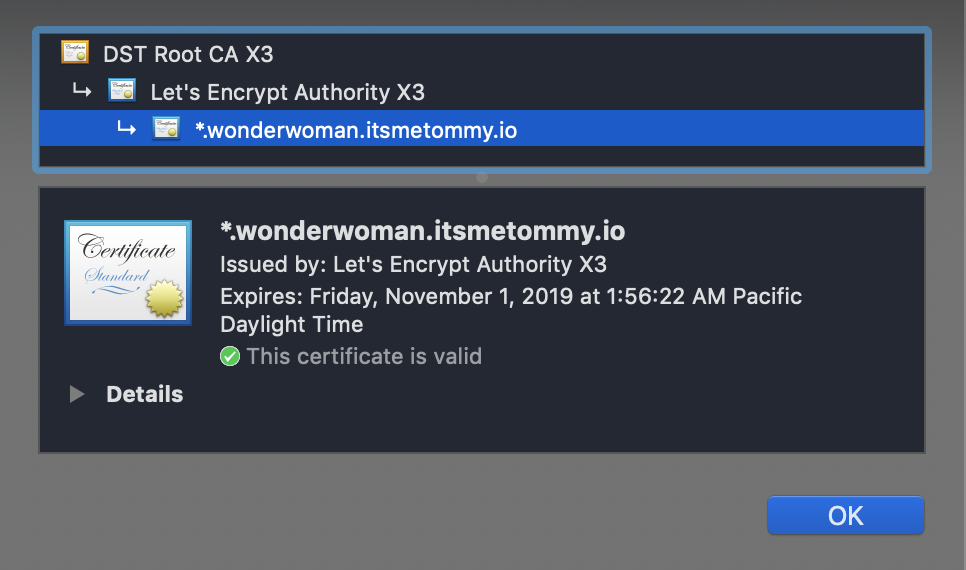
Test Configuration using SSL Labs
Setup auto-renew using cron
Update the system-wide crontab.
echo "0 0,12 * * * root python -c 'import random; import time; time.sleep(random.random() * 3600)' && certbot renew" | sudo tee -a /etc/crontab > /dev/null
One response to “Auto-Renew Let’s Encrypt Wildcard Certificate using Google Cloud DNS”
[…] https://itsmetommy.com/2019/08/03/auto-renew-lets-encrypt-wildcard-certificate-using-google-cloud-dn… […]